不说话,装高手。
Maintain silence and pretend to be an experta
nuxt3 + nestjs 实现 github 第三方授权登录
国庆在家这段时抽空研究了下如何实现 github 第三方授权登录,并且给自己的小破站加上了这个功能,写这篇文章的目的主要是记录下实现流程以及结果。
其实关于如何创建 github OAuth 应用和授权 OAuth 应用官方文档已经写的很清楚,这里我将对整个流程进行一遍梳理。
流程说明
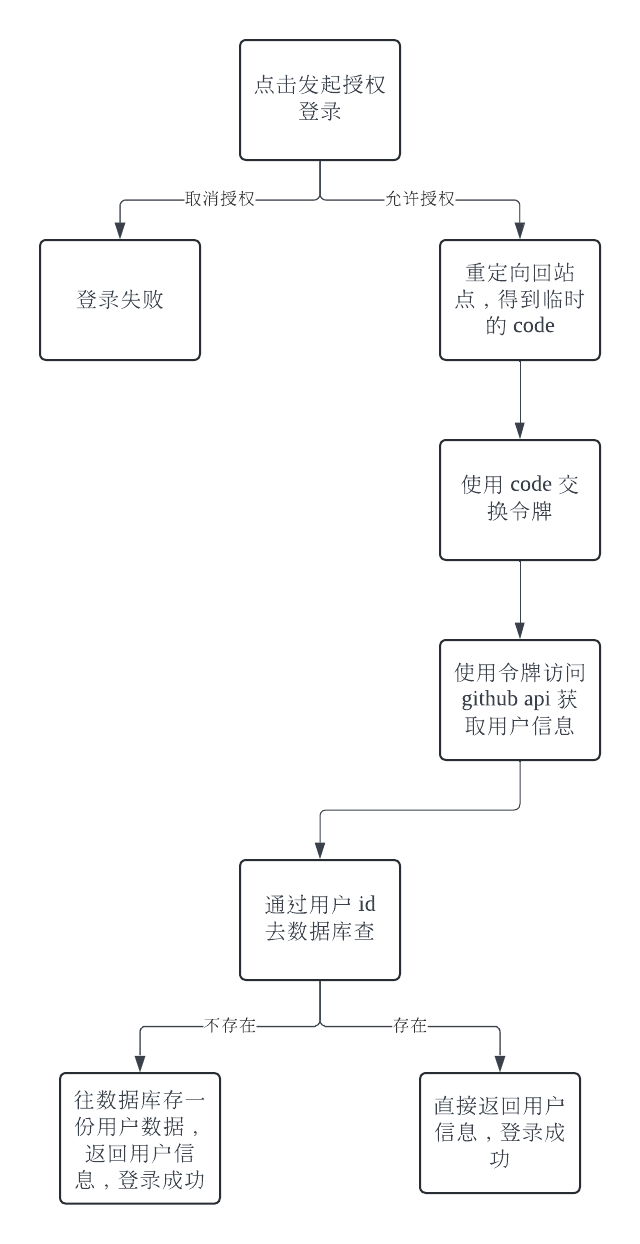
创建 OAuth 应用
登录 github 并点击右上角头像进入 Settings,找到 Developer Settings 点击进入并选择 OAuth Apps,点击 New OAuth App 创建新应用
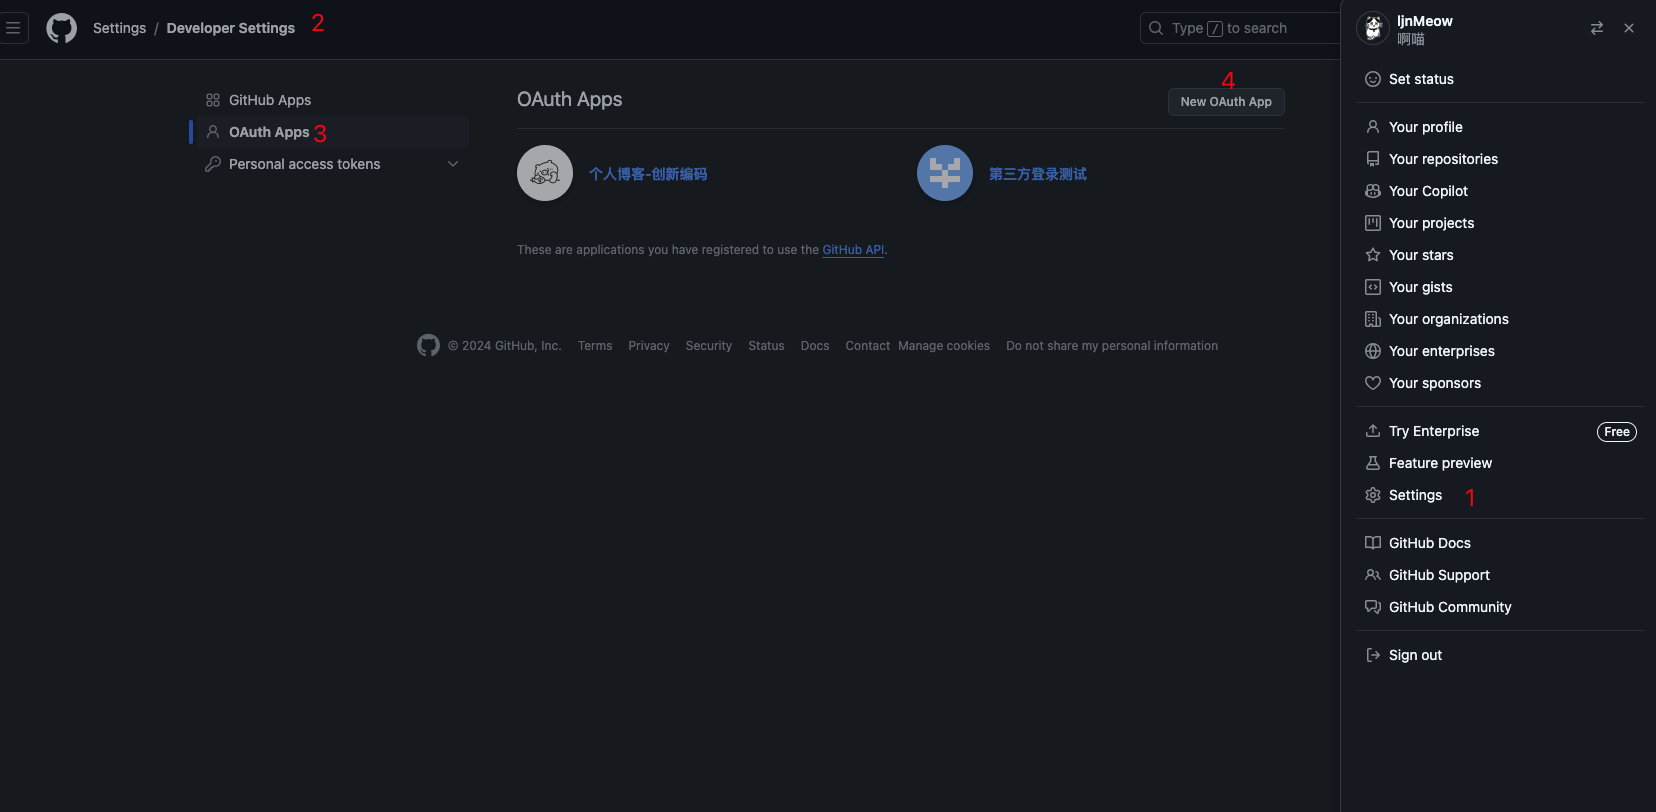
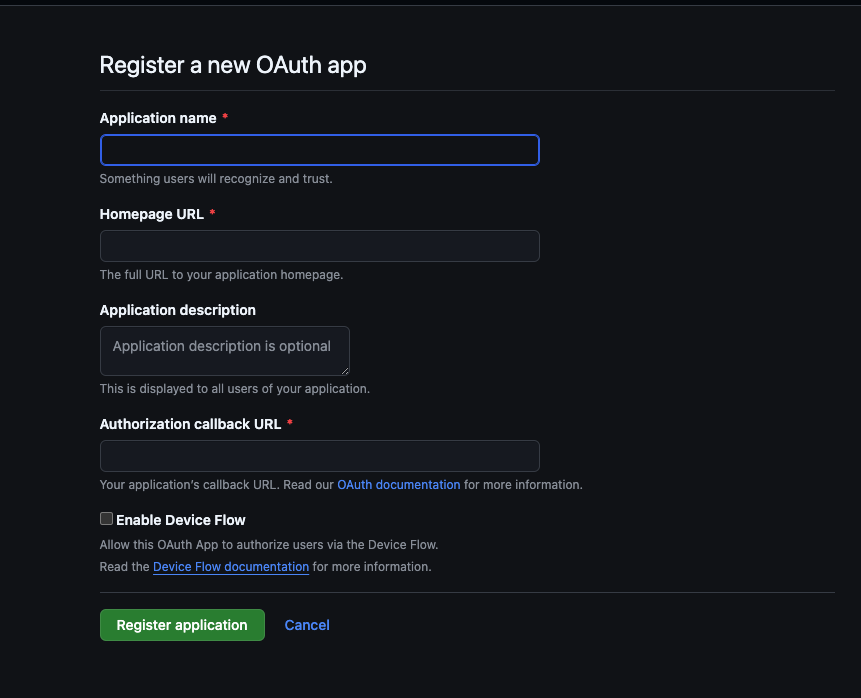
进入新增界面,添加必填项,例如应用名称、首页地址和授权回调地址,我这边创建了两个应用,分别是正式环境和开发环境使用

点击进入应用,完善信息,并创建一个新的客户端密钥复制并保存起来,注意密钥只会出现一次,所以要保存起来
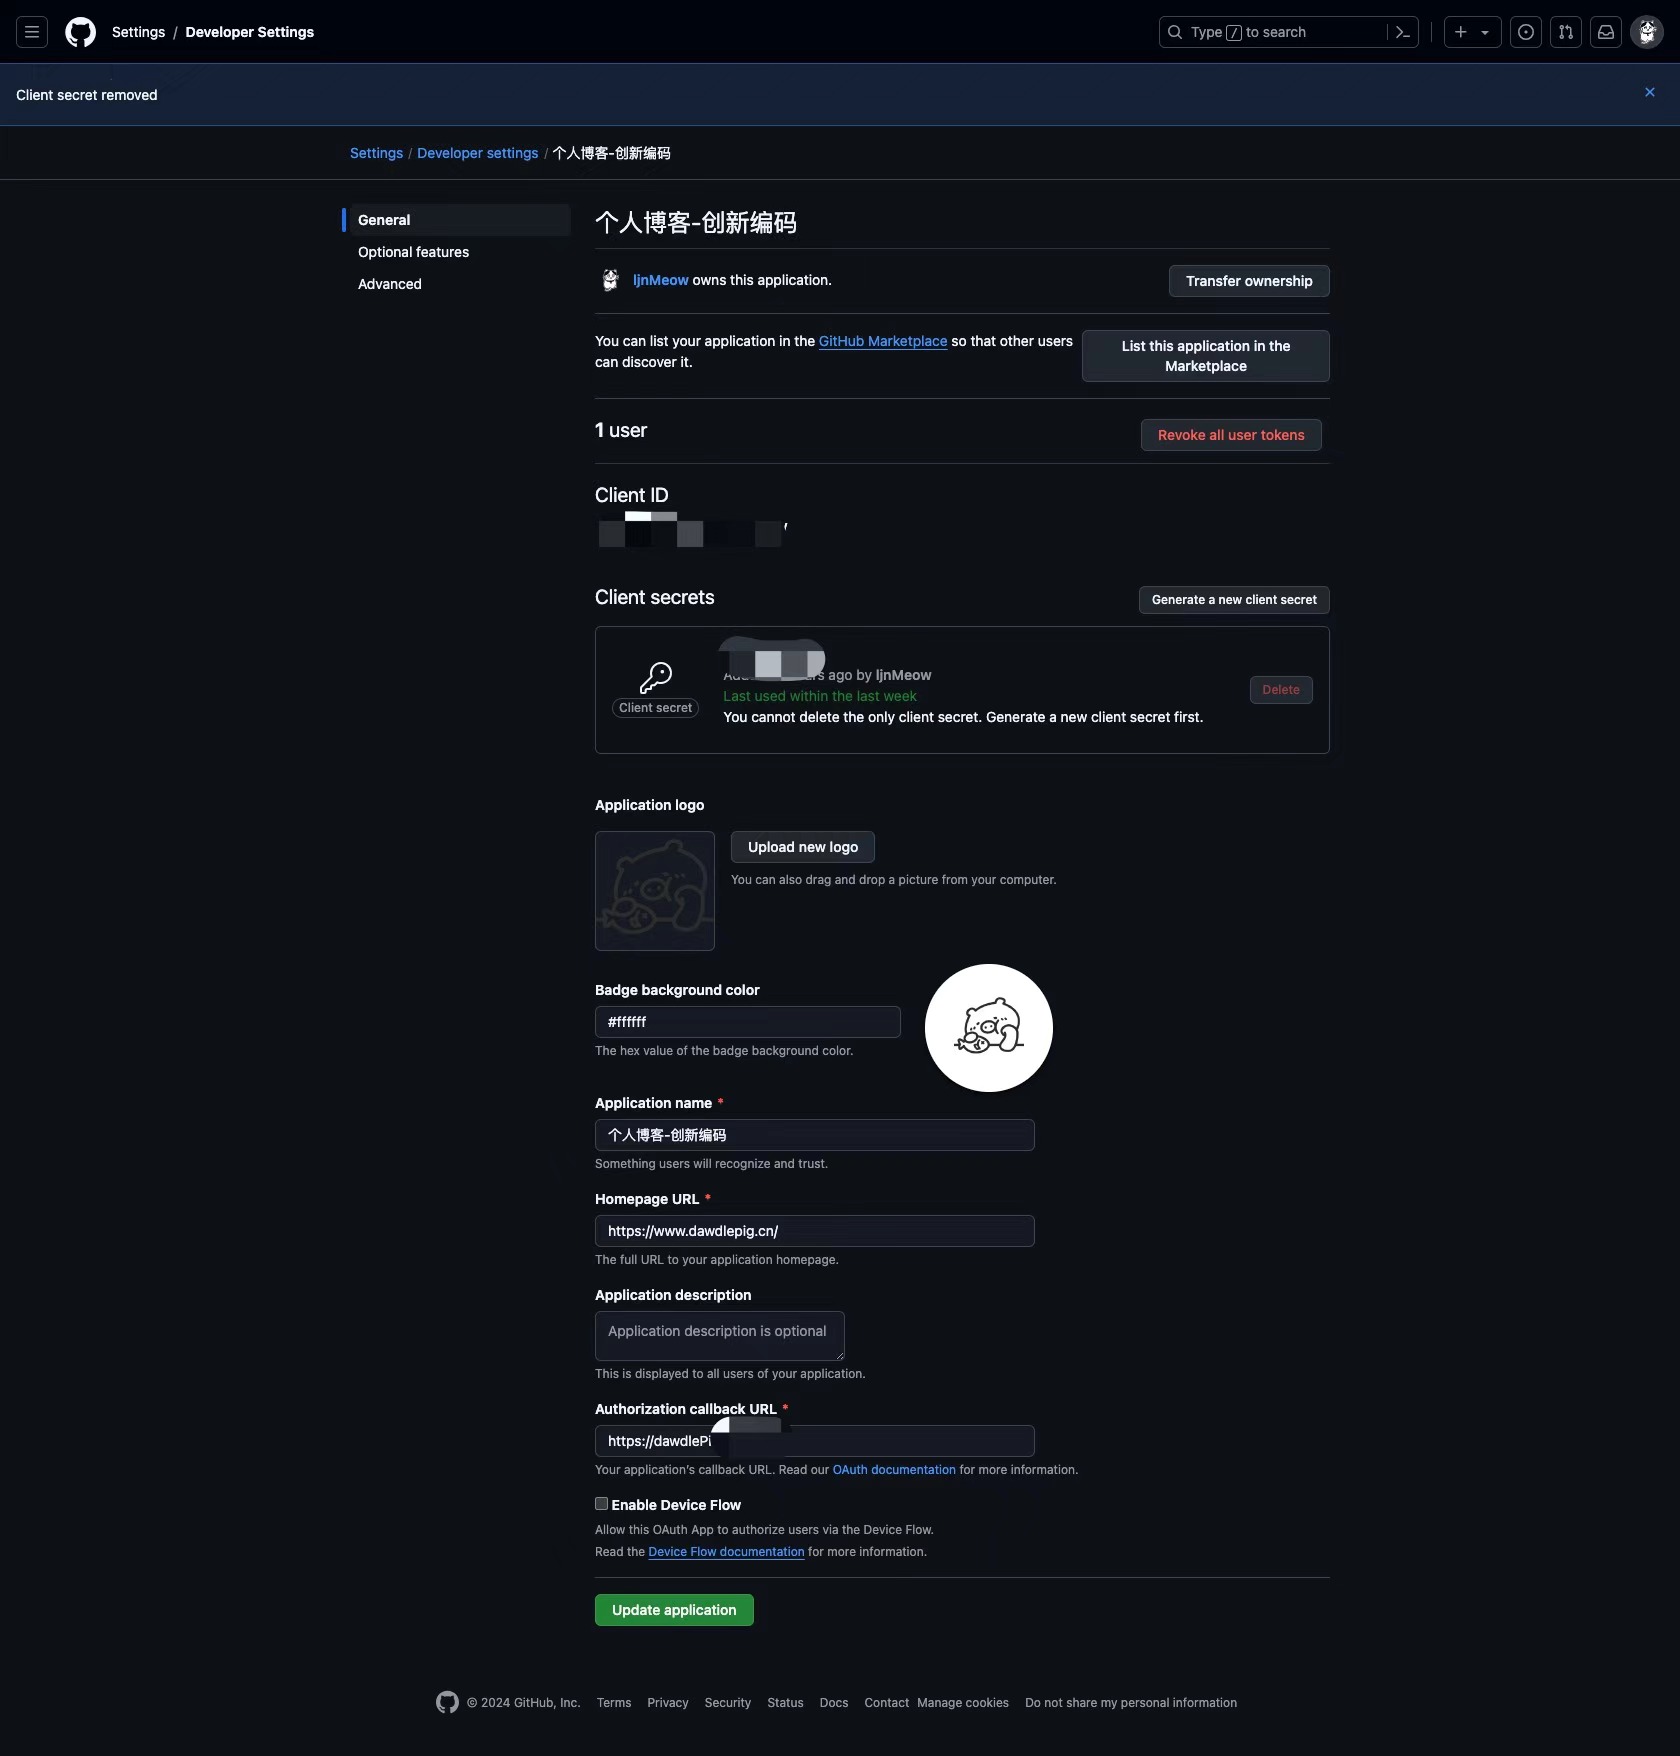
update 完所有信息后就可以进行下一步了
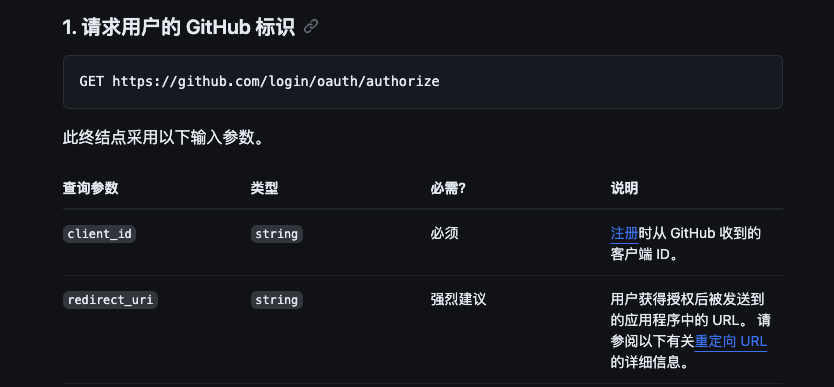
发起授权请求
通过 clientId 和重定向地址来获取用户的 github 标识
const authWitheGithub = () => {
  const authorizeUrl = "https://github.com/login/oauth/authorize";
  const clientID =
    process.env.NODE_ENV === "development"
      ? "xxxxxxxxxxxxxxxxxxxxx"
      : process.env.NODE_ENV === "production"
      ? "xxxxxxxxxxxxxxxxxxxxx"
      : undefined;
  const redirectUrl = process.env.NODE_ENV === "development"
      ? "http://localhost:3001/auth"
      : process.env.NODE_ENV === "production"
      ? "https://dawdlePig.cn/auth"
      : undefined;
  location.href = `${authorizeUrl}?client_id=${clientID}&redirect_uri=${redirectUrl}`;
};
通过 code 交换 token
用户允许授权,github 会根据你应用配置的重定向地址跳转回来并携带 code
https://dawdlePig.cn/auth?code=xxxxxxxxxxxxxxxxxxx
后面我们需要拿这个 code 去申请 access_token,然后再去获取用户信息,注意申请 access_token 需要在后端处理,因为客户端密钥不能泄露,所以拿到 code 后要传给后端,由后端来处理后续步骤
使用 code 申请 access_token
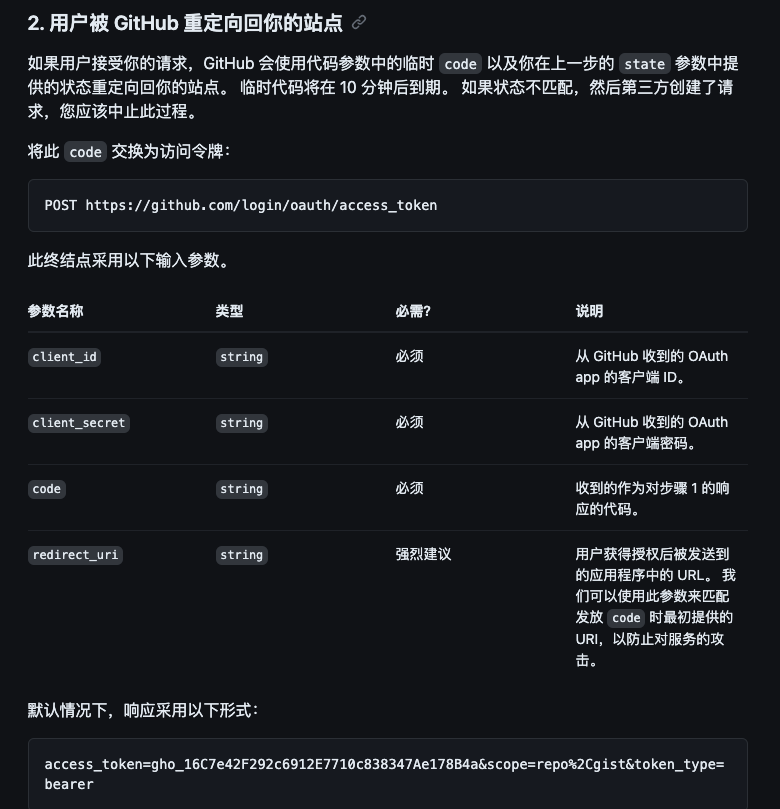
通过 client_id 和 client_secret 去申请 token
const client_id = 'xxxxxxxxxxxxxxxxx';
const client_secret = 'xxxxxxxxxxxxxxxxxxxxxxxxxxxxxxxxxx';
const { data } = await firstValueFrom(
  this.httpService.post(
     `https://github.com/login/oauth/access_token?client_id=${client_id}&client_secret=${client_secret}&code=${code}`,
      {
        headers: {
          Accept: 'application/json',
        },
        timeout: 999999999,
      },
  ),
);
得到的返回结果是这样一种形式
access_token=gho_16C7e42F292c6912E7710c838347Ae178B4a&scope=repo%2Cgist&token_type=bearer
使用 URLSearchParams 将参数提取出来
const urlParams = new URLSearchParams(data);
const access_token = urlParams.get('access_token');
const token_type = urlParams.get('token_type');
const error = urlParams.get('error');

// 判断错误,有错误直接 throw
if (error) {
   throw new HttpException(error, HttpStatus.OK);
}
没问题进行下一步
使用 access_token 和 token_type 获取用户信息
private async getUserByGithubToken(token: string, tokenType: string) {
  const { data } = await firstValueFrom(
    this.httpService.get(`https://api.github.com/user`, {
      headers: {
        Accept: 'application/json',
        Authorization: `${tokenType} ${token}`,
      },
      timeout: 999999999,
    }),
  );

  return data;
}
请求成功后得到如下数据:
{
    "login" : "ljnMeow",
    "id" : xxxxxxx,
    "node_id" : "xxxxxxxxxxxxxxx",
    "avatar_url" : "https://avatars.githubusercontent.com/u/87659948?v=4&size=64",
    "gravatar_id" : "",
    "url" : "https://api.github.com/users/ljnMeow",
    "html_url" : "https://github.com/ljnMeow",
    "followers_url" : "https://api.github.com/users/ljnMeow/followers",
    "following_url" : "https://api.github.com/users/ljnMeow/following{/other_user}",
    "gists_url" : "https://api.github.com/users/ljnMeow/gists{/gist_id}",
    "starred_url" : "https://api.github.com/users/ljnMeow/starred{/owner}{/repo}",
    "subscriptions_url" : "https://api.github.com/users/ljnMeow/subscriptions",
    "organizations_url" : "https://api.github.com/users/ljnMeow/orgs",
    "repos_url" : "https://api.github.com/users/ljnMeow/repos",
    "events_url" : "https://api.github.com/users/ljnMeow/events{/privacy}",
    "received_events_url" : "https://api.github.com/users/ljnMeow/received_events",
    "type" : "User",
    "site_admin" : false,
    "name" : null,
    "company" : null,
    "location" : "中国",
    "email" : null,
    "hireable" : null,
    "bio" : "",
    "twitter_username" : null,
    "public_repos" : 198,
    "public_gists" : 0,
    "followers" : 17,
    "following" : 5,
    "created_at" : "2018-06-20T12:50:51Z",
    "updated_at" : "2022-08-03T08:18:05Z"
}
得到用户信息后使用 id 去数据库查,因为 github 用户 id 是唯一的,login是可以修改的,所以我们要使用 id 做唯一查询
用户数据储存
使用 id 去数据库检查是否存在该数据
async checkBlogRegisterInfo(
  blogUserAddDTO: BlogUserAddDTO,
): Promise<boolean | BlogUser> {
  const { siteId } = blogUserAddDTO;
  const hasBlogUser = await this.blogUserRepository
    .createQueryBuilder('blog_user')
    .where('blog_user.siteId = :siteId', { siteId })
    .andWhere({ isDelete: false })
    .getOne();

  if (hasBlogUser) {
    return hasBlogUser;
  } else {
    return false;
  }
}
如果不存在则插入新数据,存在就直接返回数据
async blogUserResister(blogUserAddDTO: BlogUserAddDTO) {
  const { name, username, avatar, site, siteId } = blogUserAddDTO;
  const blogUser = await this.checkBlogRegisterInfo(blogUserAddDTO);

  if (!blogUser) {
    const newBlogUser = new BlogUser();
    newBlogUser.name = name;
    newBlogUser.username = username;
    newBlogUser.avatar = avatar;
    newBlogUser.site = site;
    newBlogUser.siteId = siteId;

    const result = await this.blogUserRepository.save(newBlogUser);

    return result;
  }

  return blogUser;
}
到这一步就算完成了整个 github OAuth 的对接,接下来怎么处理数据就看自己的需求了
功能预告
现在已经完成授权登录与网站用户注册功能,下一步开始留言板功能设计和开发